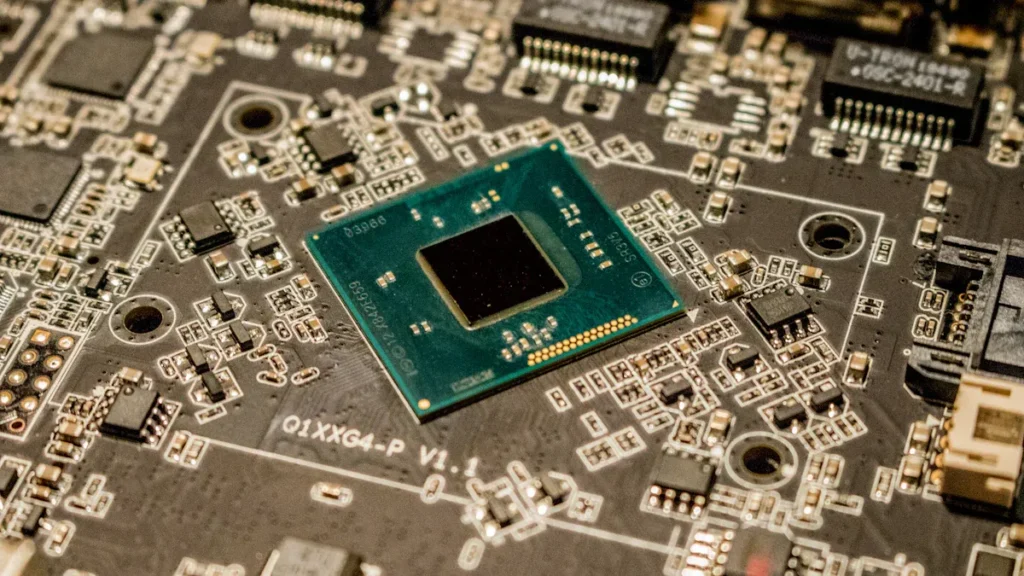

You can save time and money in your pcb assembly by making good choices early. Pcba can be 30% to 60% of the total cost. Every step to make design simple and use standard pcb parts helps. Making assembly easier is important too. Good tips are to make printed circuit boards less complex. Use fewer different parts. Plan for automation. These steps help you spend less and work faster. Get ready well and talk clearly with your team. This will help you have a cheaper pcb assembly. These ideas help you get the most from your pcb assembly process.
Key Takeaways
Start planning your PCBA early with clear papers and good talks. This helps you stop mistakes and delays. – Pick standard parts and use fewer pieces to save money. This also makes assembly faster and easier. – Design your PCB with the right layout, space, and panelization. This helps make better boards and less waste. – Use automation like surface mount technology, automated checks, and robots. This makes things faster and costs less. – Keep costs low by buying in big amounts and picking smart places to buy. Choose the best manufacturer and always check quality.
Early PCBA Planning
Planning early helps your pcb assembly go well and cost less. You can stop mistakes and delays if you focus on paperwork, talking with others, and making test boards from the start.
Clear Documentation
You need to make clear and full paperwork before you start. Good paperwork helps everyone know what to do and stops mistakes.
Pick build standards early, like IPC-A-610, for good pcba assemblies.
Write down what solder and labels you need in your notes.
Check that Gerber files, centroid files, and stencil files are right and finished.
Use Design Rule Checking (DRC) tools to find layout mistakes before you build.
When you give clear steps, the pcba manufacturer can follow your plans. This lowers the chance of mistakes and keeps things moving.
Stakeholder Communication
Talking well with everyone is important for pcb assembly. You must keep designers, engineers, suppliers, and manufacturers working together.
Make clear ways to share news and feedback.
Use project tools to watch progress and jobs.
Have meetings often to fix problems and keep everyone together.
Good talking helps stop mistakes and delays. Working as a team helps you finish on time and save money.
Prototyping Steps
Prototyping lets you check your pcb design before you make many. You can find and fix problems early, which saves time and money. Prototyping also helps you pick between machine or hand assembly.
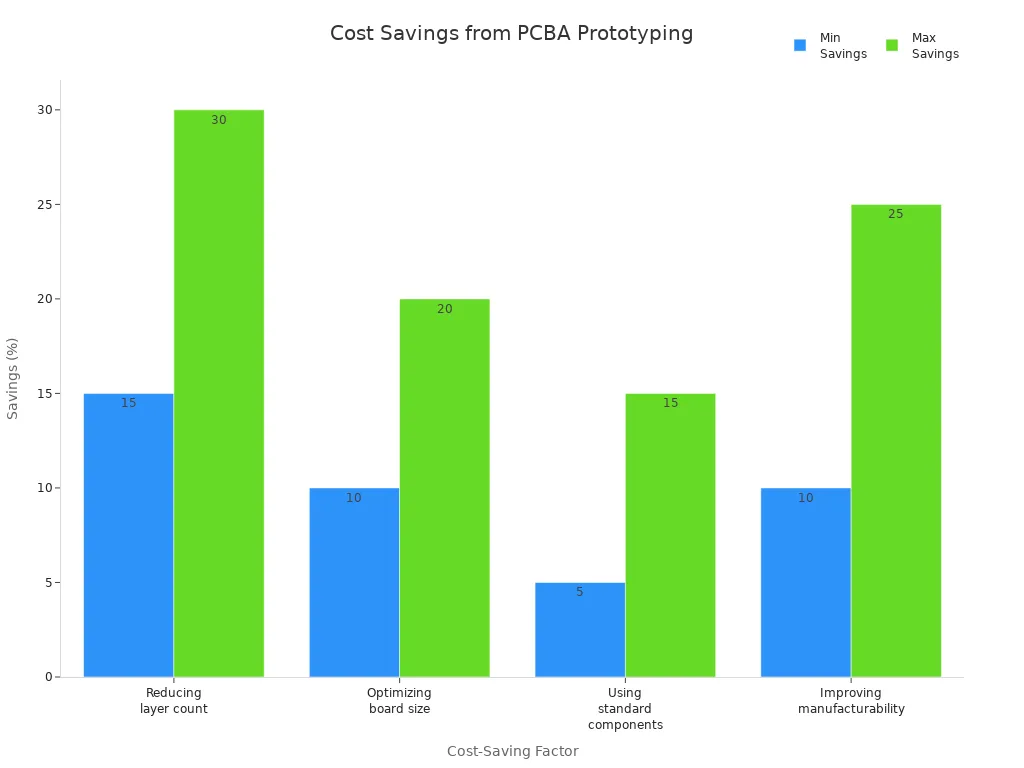
Typical Savings Range (%) | Explanation | |
|---|---|---|
Reducing layer count | 15 – 30 | Savings per removed PCB layer |
Optimizing board size | 10 – 20 | More efficient panel utilization |
Using standard components | 5 – 15 | Lower assembly costs |
Improving manufacturability | 10 – 25 | Reduction in rework or scrap |
If you plan early, you can order parts that take longer to get. This helps you skip rush fees. These early steps make your pcb assembly faster and help you save money during manufacturing.
Design for Cost-Effective PCB Assembly
The way you design your board can change how much it costs. You can save money by using standard parts and fewer components. Keeping your schematic simple also helps. These steps make your project cheaper and faster. They also help you avoid mistakes.
Standard Component Selection
Picking standard parts is a smart way to save money. These parts are easy to find and buy in big amounts. This means you pay less for each one and get them faster.
Standard parts are easy to order and come in large packs.
Buying more of the same part gives you better prices.
Standard shapes and sizes work well with machines, saving time.
Using the same parts in many designs makes inventory simple.
Special parts can slow you down and cost more because they need extra care.
Tip: Always check if your parts are still being made. This helps you avoid delays and extra costs if a part is hard to find.
Minimize Component Count
You can save money by using fewer parts in your design. Every extra part costs more to buy, place, and test. Simple designs are easier to build and more reliable.
The number and kind of parts change how much you spend.
More parts make things harder and take longer to build.
Fancy or special parts can cost even more.
Fewer parts mean fewer mistakes and faster work.
Design Choice | Impact on Cost and Efficiency |
|---|---|
Fewer components | Lower material and labor costs |
Standardized parts | Easier sourcing, better pricing |
Simple layout | Faster assembly, fewer errors |
Note: Try to use parts that do more than one job. This helps you save money and makes building easier.
Simplify Schematic Design
A simple schematic helps you avoid mistakes and extra work. When you group parts by what they do and leave space, assembly is easier.
Grouping parts by job and spacing them out lowers mistakes.
Using simple designs and fewer special fasteners saves money.
Adding things like polarized connectors stops wrong installs.
Checking footprints and the BOM makes sure you use the right parts.
Adding test points and making solder joints easy to see helps with testing.
You can use design tools to check for missing wires or mistakes. These tools help you find problems early and save money. A simple and correct schematic makes the whole process cheaper.
Tip: Talk to your manufacturer early to use standard, low-cost materials. Working together early helps you avoid expensive changes later.
PCB Assembly Process Optimization
Layout and Spacing
You can make pcb assembly better by using good layout and spacing. These rules help you stop mistakes and make building easier. When you design your pcb, remember these tips: Keep at least 0.25mm between pads and traces. This space helps stop short circuits and makes soldering simple. Leave 1.5mm between parts and close traces. This gap keeps heat from spreading too much. Use wider traces if you have more current. Figure out the width by how much current and heat you have. Put high-voltage circuits on one side and low-voltage on the other. This keeps things safe and stops signal problems. Make sure your solder mask is about half as wide as the space between wires. This helps stop solder from joining where it should not. Using these layout and spacing tips helps keep your pcb safe and working well.
Panelization Techniques
Panelization means putting many pcbs together in one big panel. This way helps you work faster and waste less during assembly. You can pick different panelization ways for your needs:
Panelization Technique | Material Utilization | Assembly Throughput | Pros | Cons |
|---|---|---|---|---|
V-scoring | High | Fast | Saves material, easy to break apart | Only works for straight edges |
Tab Routing | Medium | Good | Works for odd shapes, protects edge parts | Needs more space, costs more |
Solid Tab Panelization | Moderate | High | Strong panel, good for complex boards | Harder to separate, rough edges |
Panelization lets you build many boards at the same time. This step cuts down setup time and makes placing parts faster. You also use more of your material, so you throw away less, sometimes up to 20% less. Pick the best panelization way for your pcb and how you build it.
Correct Ring and Hole Sizing
You must pick the right hole and ring sizes for strong solder joints and easy part placement. There are rules for this part of pcb assembly:
Parameter | Level A (Max Density) | Level B (Nominal) | Level C (Min Density) |
|---|---|---|---|
Lead + 0.25 mm | Lead + 0.20 mm | Lead + 0.15 mm | |
Pad Diameter | Hole + 0.7 mm | Hole + 0.6 mm | Hole + 0.5 mm |
4 mils (mech. via) | 4 mils | 4 mils |
Make sure the annular ring is wide enough for drill moves and plating. For microvias, use at least 2 mils for the ring. Add a little more space for solder dipping. These steps help you stop weak joints and mistakes when placing parts.
Tip: Always check your design for the right hole and ring sizes before you start making your pcb. This check helps you avoid fixing mistakes later and keeps your pcba strong.
Efficient PCB Assembly with Automation
Automation changes how you build pcbs. It helps you work faster and make fewer mistakes. Using machines and smart tools can save money. Buying good equipment early can help you later. You get better results and spend less. Let’s see how automation makes pcb assembly better.
Surface Mount Technology (SMT)
Surface mount technology is now the main way to put parts on a pcb. Machines place small parts right on the board. This is much faster than old ways, like through-hole assembly. SMT lets you build more boards in less time. You also make fewer mistakes.
Here is a table that shows how surface mount technology and through-hole assembly are different:
Aspect | Surface Mount Technology (SMT) | Through-Hole Assembly (THT) |
|---|---|---|
Speed | Highly automated with pick-and-place machines and reflow ovens; estimated 10–20x faster throughput | Slower due to manual or semi-automated insertion, hole drilling, and soldering; labor-intensive |
Cost Efficiency | Higher initial setup costs (solder paste stencils, machine programming) but lower per-unit cost at scale due to automation and reduced labor | Lower setup costs but higher labor and operational costs; more expensive per unit in high volumes |
Component Size | Smaller, less expensive components enabling higher density and cost savings | Larger, pricier components often made in lower volumes |
Suitable For | High-volume production where speed and cost efficiency are critical | Low-volume prototyping, hobby projects, or applications requiring mechanical durability |
SMT is much faster and saves more money when you make lots of boards. SMT uses smaller parts, so you can fit more on each pcb. This helps you save space and money.
Tip: If you want to make many boards, pick SMT. You will finish faster and spend less money.
Automated Inspection
Automated inspection systems help you find mistakes early. These systems use cameras and smart software to check every part. You get fast and correct results, even with thousands of parts.
Some good things about automated inspection are:
The system always checks the same way, so no tired mistakes.
You save money by finding problems early and wasting less.
You can make more boards without hiring more people.
The system keeps workers safe by doing risky checks.
Special cameras and lights find tiny problems people might miss.
Automated inspection also collects data about every board. You can use this data to make your process better. When you use automated inspection, you get better quality and fewer mistakes.
Note: Buying good inspection equipment early can save money later. For example, a company spent $75,000 on a 3D inspection system. They avoided $200,000 in losses from defects over five years. This gave them more money back and a good return.
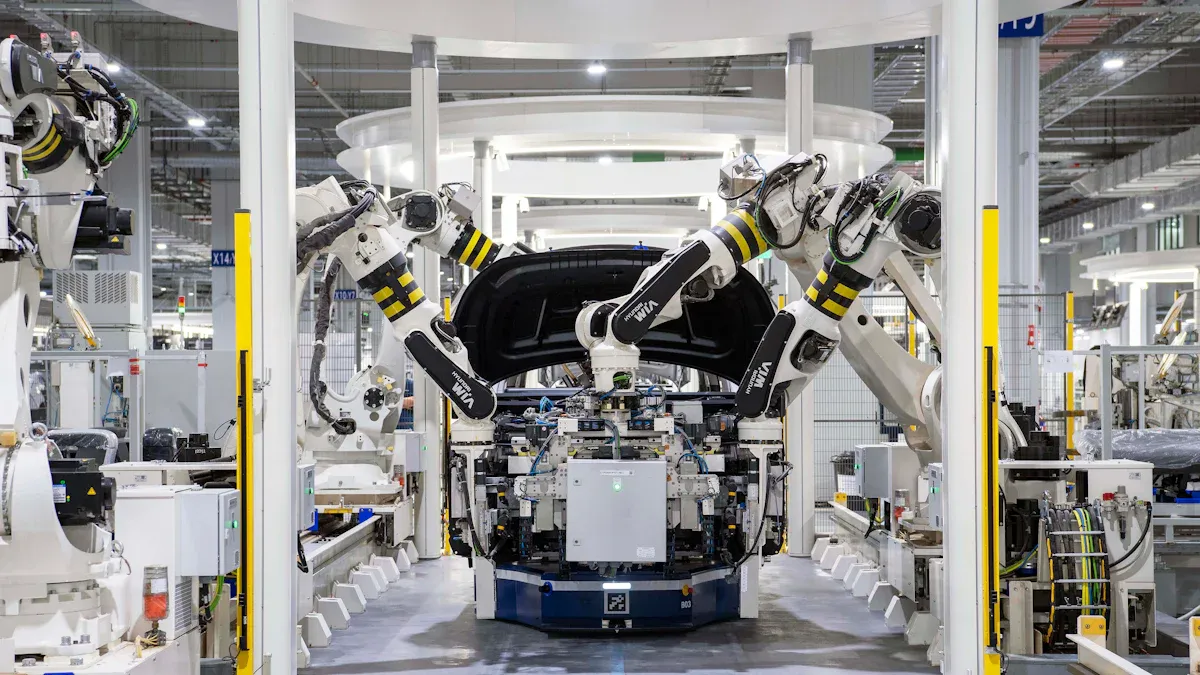
Robotics Integration
Robots now help a lot in pcb assembly. You can use robots to place parts, solder, and test boards. Robots work all day and night without stopping. You get more boards done in less time.
Here is a chart that shows how robots change pcb assembly:
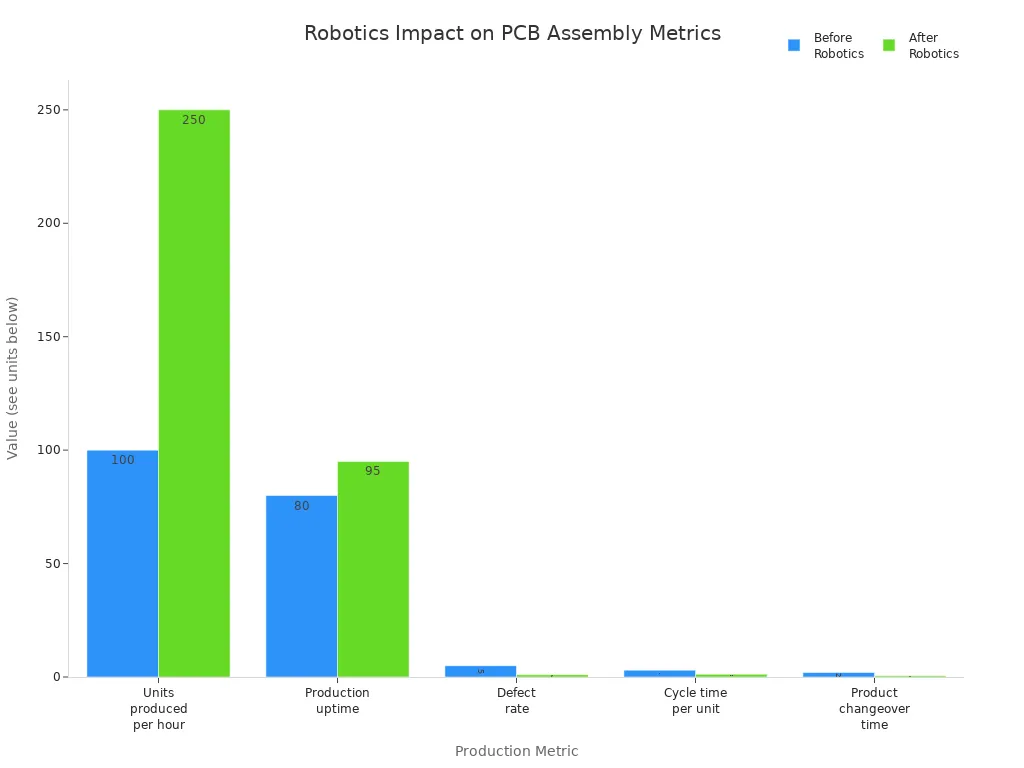
Let’s look at some numbers:
Metric | Before Robotics Integration | After Robotics Integration | Improvement |
|---|---|---|---|
Production capacity | 10,000 units/day | 85,000 units/day | |
Defect rate | 2% | 0.02% | 99% reduction |
Labor costs per unit | Baseline | Reduced by 78% | Significant cost savings |
First-pass yield | 92% | 99.7% | 8.5% improvement |
Customer warranty claims | Baseline | Reduced by 83% | Fewer defects and rework |
Production scalability | Limited | Handles 230+ variants | High flexibility and adaptability |
Robots help you make more boards and have fewer mistakes. They also lower labor costs. Robots make your work more steady. You can add more robots to make even more boards.
Tip: Start using robots early in your pcb assembly. You will see faster work, better quality, and save more money.
By using surface mount technology, automated inspection, and robots, you can make pcb assembly strong and fast. Buying these tools early gives you better quality, faster work, and lower costs for your pcba projects.
Controlling PCB Assembly Costs

Volume Discounts
You can lower pcb assembly costs by taking advantage of volume discounts. When you order more boards, the price per unit drops. This happens because setup and tooling costs spread over more units, and suppliers can buy parts in bulk. Manufacturers often use a tiered pricing model. Here is a table that shows how this works:
Aspect | Explanation |
|---|---|
Tiered Pricing Model | Unit prices drop as order size grows. For example, 1–500 units cost more per board, 500–5,000 units cost less, and 5,000+ units get the best rate. |
Economies of Scale | Larger orders use machines and materials better, so each board costs less. |
Discount Thresholds | Big discounts often start at 1,000 units, with even more savings at 5,000 or 10,000 units. |
Influencing Factors | Product complexity, BOM stability, and lead time affect how much you save. |
You can also combine projects or use panelization to reach higher order numbers. Try to use the same part sizes and group similar parts in your BOM. This helps you get better prices on components and increases your cost savings.
Smart Sourcing
Smart sourcing helps you control pcb assembly costs and avoid delays. You should watch for end-of-life notices from part makers. This lets you find new parts or buy extras before they run out. Use more than one source for key parts. This reduces risk if one supplier has a problem. Here are some steps you can follow:
Reduce the number of different parts in your design.
Work with your pcb assembly partner early to spot sourcing issues.
Test parts in prototypes to make sure they work well.
Choose trusted suppliers for important parts.
Use both local and global suppliers to get the best price and lead time.
Keep track of your inventory and review supplier performance often.
By following these steps, you can lower your manufacturing cost and improve reliability. Smart sourcing leads to more pcb assembly savings and helps you avoid costly mistakes.
Global Assembly Options
You have many choices for where to build your pcb. Offshore assembly in countries like China, Vietnam, or India can lower costs, but you need to check quality and lead times. Fast turnaround usually costs more, while longer lead times can save money. Quality checks like in-circuit testing and automated inspection are important, especially for complex boards. Some companies offer turnkey services, handling both fabrication and assembly, which can make things easier and improve quality control.
Prototype boards cost more per unit but arrive faster. Volume production gives you better prices and higher quality, but it takes longer. Shipping and customs can add to costs and lead times. The cheapest option is not always best if it causes delays or quality problems. You should balance cost, quality, and speed to get the best results for your project. This approach helps with optimizing profit and cost in your pcb assembly process.
Quality Control in PCBA
Quality control helps you make sure your pcb assembly works well. It lets you find problems early and helps your boards last longer.
In-Process Checks
You should check your work at every step. Automated Optical Inspection (AOI) looks for missing or wrong parts. AOI also finds solder bridges and other surface problems. AOI checks after you print solder paste, place parts, and finish soldering. This helps you catch mistakes before moving on. X-ray inspection finds hidden problems under chips and inside thick boards. In-circuit testing checks if each part works and connects right. These checks find most errors early, so you do not waste money fixing them later.
AOI: Finds surface problems quickly and very well.
X-ray: Shows hidden solder problems.
In-circuit testing: Checks if parts connect and work right.
AOI systems can find over 95% of common problems. This makes your process more dependable.
Functional Testing
You must make sure your board works before sending it out. Functional testing acts like real use. You turn on the board, check if it handles power, and see if it works right. You can use flying probe tests and environmental tests too. These tests put your board in heat, cold, and shaking to see if it is strong. Automated X-ray inspection helps you find hidden solder problems. In-circuit testing and continuity checks make sure all parts connect and work as they should.
Look for easy-to-see problems.
Use AOI and X-ray for close checks.
Test if the board works in real life.
Test in tough conditions for strength.
Continuous Improvement
You should always try to make your process better. Regular checks help you find weak spots and fix them. Finding problems early and learning why they happen saves money. Working with your team and suppliers helps you make steps easier and keep quality high. Flexible lines and better planning cut down waste and waiting. Doing these things over time saves money and makes your pcb assembly better.
Continuous improvement keeps your products strong and your business ahead.
You can get good results in pcba assembly by using smart machines, making choices based on data, and working with your partners early. Companies that use better inspection tools, make their work steps better, and always try to improve have fewer mistakes and spend less money. Check your process often, listen to your team’s ideas, and set easy-to-understand goals for quality and saving money. Take time to look at how you do things now and find new ways to make each step better.
FAQ
What is the best way to lower pcb assembly costs?
You can save money by picking standard parts. Use fewer components in your design. Plan to use machines for assembly. These steps help you spend less and finish faster.
How does surface mount technology help with efficiency?
Surface mount technology lets machines put parts on boards fast. This means you finish more boards in less time. It also helps you work better and make fewer mistakes.
Why should you choose cost-effective materials for printed circuit boards?
Cost-effective materials help you spend less on making boards. You still get strong boards that last a long time. Using smart choices like this gives you more savings and good results.
How do you pick the right pcba manufacturer for high-quality pcb assembly?
Check if the manufacturer has lots of experience. Make sure they do good quality checks and finish work on time. A good partner uses smart designs and strong plans. This helps you get great pcb assembly and save money.
See Also
Speeding Up PCBA Production While Maintaining Top Quality
Essential PCBA Assembly Steps To Avoid Frequent Mistakes
Cost-Effective Strategies For Optimizing Small Batch PCBA Runs
Expert PCBA Manufacturing Methods To Achieve Superior Quality
Best Practices For Low-Volume PCBA Production From One To Five Hundred